How to use Low Key Guided Edit in Adobe Photoshop Elements

Latest version of Adobe Photoshop Elements (11.0) has come up with some of the amazing Guided-Edits and one of them is 'LOW-KEY' effect. Above image is giving you some sense of Low-Key effect although results vary from one photograph depending upon the lighting spectrum in the photograph. Let's check out the workflow to achieve this and understand how it works on your photographs.Open a photograph in Editor of Adobe Photoshop Elements 11. Go to File Menu and open your photograph in Editor workspace.Click on highlighted button which Guided Edit. This is the workspace to locate Low-Key effect and I personally like the concept of Guided edits.Scroll down a bit and you will be able to locate 'LOW KEY' under Photo Effects category of Guided Edits. Click on Low Key on right side and it will open up the possibilities of making your photographs beautiful.Now simply click on the colorful dial or B&W(Black and White). It will make some of the photographs perfect and if not, there few more controls in the bottom to make the results better. For my photograph, the result shown below is default one and I haven't tried other two controls. But definitely they are extremely useful.

Latest version of Adobe Photoshop Elements (11.0) has come up with some of the amazing Guided-Edits and one of them is 'LOW-KEY' effect. Above image is giving you some sense of Low-Key effect although results vary from one photograph depending upon the lighting spectrum in the photograph. Let's check out the workflow to achieve this and understand how it works on your photographs.

Latest version of Adobe Photoshop Elements (11.0) has come up with some of the amazing Guided-Edits and one of them is 'LOW-KEY' effect. Above image is giving you some sense of Low-Key effect although results vary from one photograph depending upon the lighting spectrum in the photograph. Let's check out the workflow to achieve this and understand how it works on your photographs.Open a photograph in Editor of Adobe Photoshop Elements 11. Go to File Menu and open your photograph in Editor workspace.Click on highlighted button which Guided Edit. This is the workspace to locate Low-Key effect and I personally like the concept of Guided edits.Scroll down a bit and you will be able to locate 'LOW KEY' under Photo Effects category of Guided Edits. Click on Low Key on right side and it will open up the possibilities of making your photographs beautiful.Now simply click on the colorful dial or B&W(Black and White). It will make some of the photographs perfect and if not, there few more controls in the bottom to make the results better. For my photograph, the result shown below is default one and I haven't tried other two controls. But definitely they are extremely useful.

Open a photograph in Editor of Adobe Photoshop Elements 11. Go to File Menu and open your photograph in Editor workspace.

Latest version of Adobe Photoshop Elements (11.0) has come up with some of the amazing Guided-Edits and one of them is 'LOW-KEY' effect. Above image is giving you some sense of Low-Key effect although results vary from one photograph depending upon the lighting spectrum in the photograph. Let's check out the workflow to achieve this and understand how it works on your photographs.Open a photograph in Editor of Adobe Photoshop Elements 11. Go to File Menu and open your photograph in Editor workspace.Click on highlighted button which Guided Edit. This is the workspace to locate Low-Key effect and I personally like the concept of Guided edits.Scroll down a bit and you will be able to locate 'LOW KEY' under Photo Effects category of Guided Edits. Click on Low Key on right side and it will open up the possibilities of making your photographs beautiful.Now simply click on the colorful dial or B&W(Black and White). It will make some of the photographs perfect and if not, there few more controls in the bottom to make the results better. For my photograph, the result shown below is default one and I haven't tried other two controls. But definitely they are extremely useful.

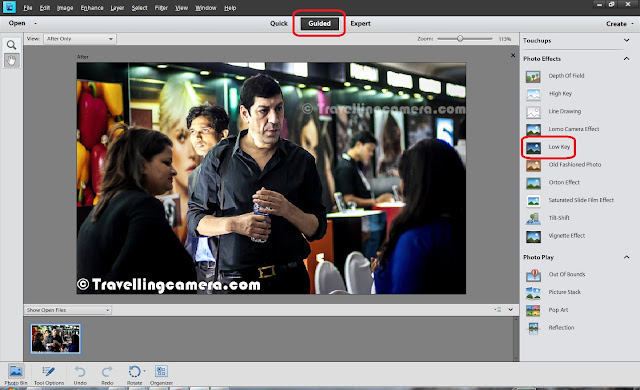
Click on highlighted button which Guided Edit. This is the workspace to locate Low-Key effect and I personally like the concept of Guided edits.


Latest version of Adobe Photoshop Elements (11.0) has come up with some of the amazing Guided-Edits and one of them is 'LOW-KEY' effect. Above image is giving you some sense of Low-Key effect although results vary from one photograph depending upon the lighting spectrum in the photograph. Let's check out the workflow to achieve this and understand how it works on your photographs.Open a photograph in Editor of Adobe Photoshop Elements 11. Go to File Menu and open your photograph in Editor workspace.Click on highlighted button which Guided Edit. This is the workspace to locate Low-Key effect and I personally like the concept of Guided edits.Scroll down a bit and you will be able to locate 'LOW KEY' under Photo Effects category of Guided Edits. Click on Low Key on right side and it will open up the possibilities of making your photographs beautiful.Now simply click on the colorful dial or B&W(Black and White). It will make some of the photographs perfect and if not, there few more controls in the bottom to make the results better. For my photograph, the result shown below is default one and I haven't tried other two controls. But definitely they are extremely useful.

Scroll down a bit and you will be able to locate 'LOW KEY' under Photo Effects category of Guided Edits. Click on Low Key on right side and it will open up the possibilities of making your photographs beautiful.

Latest version of Adobe Photoshop Elements (11.0) has come up with some of the amazing Guided-Edits and one of them is 'LOW-KEY' effect. Above image is giving you some sense of Low-Key effect although results vary from one photograph depending upon the lighting spectrum in the photograph. Let's check out the workflow to achieve this and understand how it works on your photographs.Open a photograph in Editor of Adobe Photoshop Elements 11. Go to File Menu and open your photograph in Editor workspace.Click on highlighted button which Guided Edit. This is the workspace to locate Low-Key effect and I personally like the concept of Guided edits.Scroll down a bit and you will be able to locate 'LOW KEY' under Photo Effects category of Guided Edits. Click on Low Key on right side and it will open up the possibilities of making your photographs beautiful.Now simply click on the colorful dial or B&W(Black and White). It will make some of the photographs perfect and if not, there few more controls in the bottom to make the results better. For my photograph, the result shown below is default one and I haven't tried other two controls. But definitely they are extremely useful.

Now simply click on the colorful dial or B&W(Black and White). It will make some of the photographs perfect and if not, there few more controls in the bottom to make the results better. For my photograph, the result shown below is default one and I haven't tried other two controls. But definitely they are extremely useful.


Latest version of Adobe Photoshop Elements (11.0) has come up with some of the amazing Guided-Edits and one of them is 'LOW-KEY' effect. Above image is giving you some sense of Low-Key effect although results vary from one photograph depending upon the lighting spectrum in the photograph. Let's check out the workflow to achieve this and understand how it works on your photographs.Open a photograph in Editor of Adobe Photoshop Elements 11. Go to File Menu and open your photograph in Editor workspace.Click on highlighted button which Guided Edit. This is the workspace to locate Low-Key effect and I personally like the concept of Guided edits.Scroll down a bit and you will be able to locate 'LOW KEY' under Photo Effects category of Guided Edits. Click on Low Key on right side and it will open up the possibilities of making your photographs beautiful.Now simply click on the colorful dial or B&W(Black and White). It will make some of the photographs perfect and if not, there few more controls in the bottom to make the results better. For my photograph, the result shown below is default one and I haven't tried other two controls. But definitely they are extremely useful.
Comments

Trending Post Today !

How to reach Kasol/Malana and top things to do around this stunning hill-station of Himalayan State of India

Main places to see & Top things to do around Dalhousie : Stunning Hill Station in Himalayan State of India