How to create Silhoutte in Adobe Photoshop Elements || Creative use of Layer Masks

Today I was reading a user discussion on Adobe Forums, where on of the PSE users asked about creating artificial silhouettes in Adobe Photoshop Elements. I had never even thought of such thing in this software, as I am a user who mainly focus on processing basic things in original photograph. Let's explore this process of creating Silhouettes through Layers Masks of Adobe Photoshop Elements...Let's go step by step for creating silhouettes in Adobe Photoshop Elements -1. Open the photograph in Adobe Photoshop Elements Editor. Option is available under File Menu of PSE-Edtior.2. Now select the subject which you want to convert into a silhouette. 3. After selection is done, create new layer on top of main background layer. New Layer can be created using CTRL+J or layer menu on the top. Also option is available in Layer panel, which is shown on right side.4. Now, select newly created layer and click on 'Add Layer Mask' button in the bottom of Layers panel of Adobe Photoshop Elements. Your layers panel should look like something shown below.5. Now, select the mask and press CTRL+I, to invert the mask. Black colored area will be changed to white and vice-versa. Please see the image below and compare it with the one shown above.6. Duplicate top layer through Layers Menu or layers panel itself.7. Now again press CTRL+I to invert the top layer mask. Finally the workspace should look like the one shown below.8. Now select top most layer and press on Paint Bucket tool shown on left tools panel. Make sure Black color is selected and click on the image. The subject will be changed to black and that is what we intended to do. To me below photograph is fine as I get silhouette effect with blue sky in background.9. In case you want something else in the background, that is also possible. Here I have simply pained the second layer with white color. Instead of this other color can be used, pattern can be applied or gradient could be another option.Please feel free to put comments about the feedback or further questions around the same.

Today I was reading a user discussion on Adobe Forums, where on of the PSE users asked about creating artificial silhouettes in Adobe Photoshop Elements. I had never even thought of such thing in this software, as I am a user who mainly focus on processing basic things in original photograph. Let's explore this process of creating Silhouettes through Layers Masks of Adobe Photoshop Elements...


Today I was reading a user discussion on Adobe Forums, where on of the PSE users asked about creating artificial silhouettes in Adobe Photoshop Elements. I had never even thought of such thing in this software, as I am a user who mainly focus on processing basic things in original photograph. Let's explore this process of creating Silhouettes through Layers Masks of Adobe Photoshop Elements...Let's go step by step for creating silhouettes in Adobe Photoshop Elements -1. Open the photograph in Adobe Photoshop Elements Editor. Option is available under File Menu of PSE-Edtior.2. Now select the subject which you want to convert into a silhouette. 3. After selection is done, create new layer on top of main background layer. New Layer can be created using CTRL+J or layer menu on the top. Also option is available in Layer panel, which is shown on right side.4. Now, select newly created layer and click on 'Add Layer Mask' button in the bottom of Layers panel of Adobe Photoshop Elements. Your layers panel should look like something shown below.5. Now, select the mask and press CTRL+I, to invert the mask. Black colored area will be changed to white and vice-versa. Please see the image below and compare it with the one shown above.6. Duplicate top layer through Layers Menu or layers panel itself.7. Now again press CTRL+I to invert the top layer mask. Finally the workspace should look like the one shown below.8. Now select top most layer and press on Paint Bucket tool shown on left tools panel. Make sure Black color is selected and click on the image. The subject will be changed to black and that is what we intended to do. To me below photograph is fine as I get silhouette effect with blue sky in background.9. In case you want something else in the background, that is also possible. Here I have simply pained the second layer with white color. Instead of this other color can be used, pattern can be applied or gradient could be another option.Please feel free to put comments about the feedback or further questions around the same.

Let's go step by step for creating silhouettes in Adobe Photoshop Elements -

1. Open the photograph in Adobe Photoshop Elements Editor. Option is available under File Menu of PSE-Edtior.

2. Now select the subject which you want to convert into a silhouette. 

3. After selection is done, create new layer on top of main background layer. New Layer can be created using CTRL+J or layer menu on the top. Also option is available in Layer panel, which is shown on right side.

Today I was reading a user discussion on Adobe Forums, where on of the PSE users asked about creating artificial silhouettes in Adobe Photoshop Elements. I had never even thought of such thing in this software, as I am a user who mainly focus on processing basic things in original photograph. Let's explore this process of creating Silhouettes through Layers Masks of Adobe Photoshop Elements...Let's go step by step for creating silhouettes in Adobe Photoshop Elements -1. Open the photograph in Adobe Photoshop Elements Editor. Option is available under File Menu of PSE-Edtior.2. Now select the subject which you want to convert into a silhouette. 3. After selection is done, create new layer on top of main background layer. New Layer can be created using CTRL+J or layer menu on the top. Also option is available in Layer panel, which is shown on right side.4. Now, select newly created layer and click on 'Add Layer Mask' button in the bottom of Layers panel of Adobe Photoshop Elements. Your layers panel should look like something shown below.5. Now, select the mask and press CTRL+I, to invert the mask. Black colored area will be changed to white and vice-versa. Please see the image below and compare it with the one shown above.6. Duplicate top layer through Layers Menu or layers panel itself.7. Now again press CTRL+I to invert the top layer mask. Finally the workspace should look like the one shown below.8. Now select top most layer and press on Paint Bucket tool shown on left tools panel. Make sure Black color is selected and click on the image. The subject will be changed to black and that is what we intended to do. To me below photograph is fine as I get silhouette effect with blue sky in background.9. In case you want something else in the background, that is also possible. Here I have simply pained the second layer with white color. Instead of this other color can be used, pattern can be applied or gradient could be another option.Please feel free to put comments about the feedback or further questions around the same.

4. Now, select newly created layer and click on 'Add Layer Mask' button in the bottom of Layers panel of Adobe Photoshop Elements. Your layers panel should look like something shown below.

Today I was reading a user discussion on Adobe Forums, where on of the PSE users asked about creating artificial silhouettes in Adobe Photoshop Elements. I had never even thought of such thing in this software, as I am a user who mainly focus on processing basic things in original photograph. Let's explore this process of creating Silhouettes through Layers Masks of Adobe Photoshop Elements...Let's go step by step for creating silhouettes in Adobe Photoshop Elements -1. Open the photograph in Adobe Photoshop Elements Editor. Option is available under File Menu of PSE-Edtior.2. Now select the subject which you want to convert into a silhouette. 3. After selection is done, create new layer on top of main background layer. New Layer can be created using CTRL+J or layer menu on the top. Also option is available in Layer panel, which is shown on right side.4. Now, select newly created layer and click on 'Add Layer Mask' button in the bottom of Layers panel of Adobe Photoshop Elements. Your layers panel should look like something shown below.5. Now, select the mask and press CTRL+I, to invert the mask. Black colored area will be changed to white and vice-versa. Please see the image below and compare it with the one shown above.6. Duplicate top layer through Layers Menu or layers panel itself.7. Now again press CTRL+I to invert the top layer mask. Finally the workspace should look like the one shown below.8. Now select top most layer and press on Paint Bucket tool shown on left tools panel. Make sure Black color is selected and click on the image. The subject will be changed to black and that is what we intended to do. To me below photograph is fine as I get silhouette effect with blue sky in background.9. In case you want something else in the background, that is also possible. Here I have simply pained the second layer with white color. Instead of this other color can be used, pattern can be applied or gradient could be another option.Please feel free to put comments about the feedback or further questions around the same.

5. Now, select the mask and press CTRL+I, to invert the mask. Black colored area will be changed to white and vice-versa. Please see the image below and compare it with the one shown above.

Today I was reading a user discussion on Adobe Forums, where on of the PSE users asked about creating artificial silhouettes in Adobe Photoshop Elements. I had never even thought of such thing in this software, as I am a user who mainly focus on processing basic things in original photograph. Let's explore this process of creating Silhouettes through Layers Masks of Adobe Photoshop Elements...Let's go step by step for creating silhouettes in Adobe Photoshop Elements -1. Open the photograph in Adobe Photoshop Elements Editor. Option is available under File Menu of PSE-Edtior.2. Now select the subject which you want to convert into a silhouette. 3. After selection is done, create new layer on top of main background layer. New Layer can be created using CTRL+J or layer menu on the top. Also option is available in Layer panel, which is shown on right side.4. Now, select newly created layer and click on 'Add Layer Mask' button in the bottom of Layers panel of Adobe Photoshop Elements. Your layers panel should look like something shown below.5. Now, select the mask and press CTRL+I, to invert the mask. Black colored area will be changed to white and vice-versa. Please see the image below and compare it with the one shown above.6. Duplicate top layer through Layers Menu or layers panel itself.7. Now again press CTRL+I to invert the top layer mask. Finally the workspace should look like the one shown below.8. Now select top most layer and press on Paint Bucket tool shown on left tools panel. Make sure Black color is selected and click on the image. The subject will be changed to black and that is what we intended to do. To me below photograph is fine as I get silhouette effect with blue sky in background.9. In case you want something else in the background, that is also possible. Here I have simply pained the second layer with white color. Instead of this other color can be used, pattern can be applied or gradient could be another option.Please feel free to put comments about the feedback or further questions around the same.

6. Duplicate top layer through Layers Menu or layers panel itself.

Today I was reading a user discussion on Adobe Forums, where on of the PSE users asked about creating artificial silhouettes in Adobe Photoshop Elements. I had never even thought of such thing in this software, as I am a user who mainly focus on processing basic things in original photograph. Let's explore this process of creating Silhouettes through Layers Masks of Adobe Photoshop Elements...Let's go step by step for creating silhouettes in Adobe Photoshop Elements -1. Open the photograph in Adobe Photoshop Elements Editor. Option is available under File Menu of PSE-Edtior.2. Now select the subject which you want to convert into a silhouette. 3. After selection is done, create new layer on top of main background layer. New Layer can be created using CTRL+J or layer menu on the top. Also option is available in Layer panel, which is shown on right side.4. Now, select newly created layer and click on 'Add Layer Mask' button in the bottom of Layers panel of Adobe Photoshop Elements. Your layers panel should look like something shown below.5. Now, select the mask and press CTRL+I, to invert the mask. Black colored area will be changed to white and vice-versa. Please see the image below and compare it with the one shown above.6. Duplicate top layer through Layers Menu or layers panel itself.7. Now again press CTRL+I to invert the top layer mask. Finally the workspace should look like the one shown below.8. Now select top most layer and press on Paint Bucket tool shown on left tools panel. Make sure Black color is selected and click on the image. The subject will be changed to black and that is what we intended to do. To me below photograph is fine as I get silhouette effect with blue sky in background.9. In case you want something else in the background, that is also possible. Here I have simply pained the second layer with white color. Instead of this other color can be used, pattern can be applied or gradient could be another option.Please feel free to put comments about the feedback or further questions around the same.

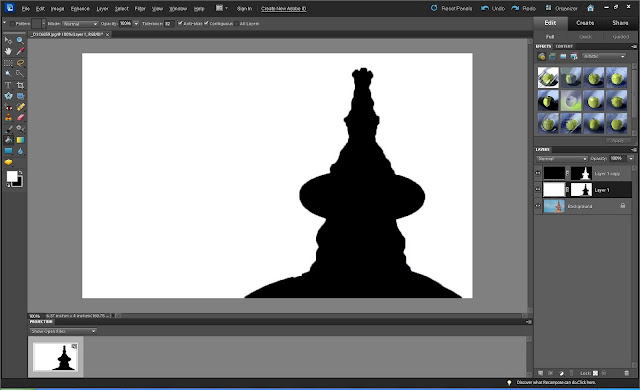
7. Now again press CTRL+I to invert the top layer mask. Finally the workspace should look like the one shown below.

Today I was reading a user discussion on Adobe Forums, where on of the PSE users asked about creating artificial silhouettes in Adobe Photoshop Elements. I had never even thought of such thing in this software, as I am a user who mainly focus on processing basic things in original photograph. Let's explore this process of creating Silhouettes through Layers Masks of Adobe Photoshop Elements...Let's go step by step for creating silhouettes in Adobe Photoshop Elements -1. Open the photograph in Adobe Photoshop Elements Editor. Option is available under File Menu of PSE-Edtior.2. Now select the subject which you want to convert into a silhouette. 3. After selection is done, create new layer on top of main background layer. New Layer can be created using CTRL+J or layer menu on the top. Also option is available in Layer panel, which is shown on right side.4. Now, select newly created layer and click on 'Add Layer Mask' button in the bottom of Layers panel of Adobe Photoshop Elements. Your layers panel should look like something shown below.5. Now, select the mask and press CTRL+I, to invert the mask. Black colored area will be changed to white and vice-versa. Please see the image below and compare it with the one shown above.6. Duplicate top layer through Layers Menu or layers panel itself.7. Now again press CTRL+I to invert the top layer mask. Finally the workspace should look like the one shown below.8. Now select top most layer and press on Paint Bucket tool shown on left tools panel. Make sure Black color is selected and click on the image. The subject will be changed to black and that is what we intended to do. To me below photograph is fine as I get silhouette effect with blue sky in background.9. In case you want something else in the background, that is also possible. Here I have simply pained the second layer with white color. Instead of this other color can be used, pattern can be applied or gradient could be another option.Please feel free to put comments about the feedback or further questions around the same.

8. Now select top most layer and press on Paint Bucket tool shown on left tools panel. Make sure Black color is selected and click on the image. The subject will be changed to black and that is what we intended to do. To me below photograph is fine as I get silhouette effect with blue sky in background.

Today I was reading a user discussion on Adobe Forums, where on of the PSE users asked about creating artificial silhouettes in Adobe Photoshop Elements. I had never even thought of such thing in this software, as I am a user who mainly focus on processing basic things in original photograph. Let's explore this process of creating Silhouettes through Layers Masks of Adobe Photoshop Elements...Let's go step by step for creating silhouettes in Adobe Photoshop Elements -1. Open the photograph in Adobe Photoshop Elements Editor. Option is available under File Menu of PSE-Edtior.2. Now select the subject which you want to convert into a silhouette. 3. After selection is done, create new layer on top of main background layer. New Layer can be created using CTRL+J or layer menu on the top. Also option is available in Layer panel, which is shown on right side.4. Now, select newly created layer and click on 'Add Layer Mask' button in the bottom of Layers panel of Adobe Photoshop Elements. Your layers panel should look like something shown below.5. Now, select the mask and press CTRL+I, to invert the mask. Black colored area will be changed to white and vice-versa. Please see the image below and compare it with the one shown above.6. Duplicate top layer through Layers Menu or layers panel itself.7. Now again press CTRL+I to invert the top layer mask. Finally the workspace should look like the one shown below.8. Now select top most layer and press on Paint Bucket tool shown on left tools panel. Make sure Black color is selected and click on the image. The subject will be changed to black and that is what we intended to do. To me below photograph is fine as I get silhouette effect with blue sky in background.9. In case you want something else in the background, that is also possible. Here I have simply pained the second layer with white color. Instead of this other color can be used, pattern can be applied or gradient could be another option.Please feel free to put comments about the feedback or further questions around the same.

9. In case you want something else in the background, that is also possible. Here I have simply pained the second layer with white color. Instead of this other color can be used, pattern can be applied or gradient could be another option.

Today I was reading a user discussion on Adobe Forums, where on of the PSE users asked about creating artificial silhouettes in Adobe Photoshop Elements. I had never even thought of such thing in this software, as I am a user who mainly focus on processing basic things in original photograph. Let's explore this process of creating Silhouettes through Layers Masks of Adobe Photoshop Elements...Let's go step by step for creating silhouettes in Adobe Photoshop Elements -1. Open the photograph in Adobe Photoshop Elements Editor. Option is available under File Menu of PSE-Edtior.2. Now select the subject which you want to convert into a silhouette. 3. After selection is done, create new layer on top of main background layer. New Layer can be created using CTRL+J or layer menu on the top. Also option is available in Layer panel, which is shown on right side.4. Now, select newly created layer and click on 'Add Layer Mask' button in the bottom of Layers panel of Adobe Photoshop Elements. Your layers panel should look like something shown below.5. Now, select the mask and press CTRL+I, to invert the mask. Black colored area will be changed to white and vice-versa. Please see the image below and compare it with the one shown above.6. Duplicate top layer through Layers Menu or layers panel itself.7. Now again press CTRL+I to invert the top layer mask. Finally the workspace should look like the one shown below.8. Now select top most layer and press on Paint Bucket tool shown on left tools panel. Make sure Black color is selected and click on the image. The subject will be changed to black and that is what we intended to do. To me below photograph is fine as I get silhouette effect with blue sky in background.9. In case you want something else in the background, that is also possible. Here I have simply pained the second layer with white color. Instead of this other color can be used, pattern can be applied or gradient could be another option.Please feel free to put comments about the feedback or further questions around the same.

Please feel free to put comments about the feedback or further questions around the same.

Trending Post Today !

How to reach Kasol/Malana and top things to do around this stunning hill-station of Himalayan State of India

Main places to see & Top things to do around Dalhousie : Stunning Hill Station in Himalayan State of India