How to create Blended Text effect in Adobe Photoshop Elements || Writing blended Text on top of a Photograph

Text Blending is defined in various ways and many folks want to use Text Blending on their photographs. Here we are trying to share the basic way of applying it and the method used should be helpful in understanding the way blending happens... So let's go step by step1. Open your photograph in Adobe Photoshop Elements Editor2. Select Text-Tool from left side of Adobe Photoshop Elements and type text you want to have on top of your photograph.3. Make sure that Text Layer is selected.4. Go to Layers Menu and go to 'Layer Style' & then 'Style Settings'5. Check 'Storke' and put it between 1 to 6... Ensure that appropriate color is selected for Stroke6. Now go to Layer Mode and Select 'Exclusion'7. It will make the Text area transparent and boundary will show the text on top of it.

Text Blending is defined in various ways and many folks want to use Text Blending on their photographs. Here we are trying to share the basic way of applying it and the method used should be helpful in understanding the way blending happens...

So let's go step by step-

1. Open your photograph in Adobe Photoshop Elements Editor.

Text Blending is defined in various ways and many folks want to use Text Blending on their photographs. Here we are trying to share the basic way of applying it and the method used should be helpful in understanding the way blending happens... So let's go step by step1. Open your photograph in Adobe Photoshop Elements Editor2. Select Text-Tool from left side of Adobe Photoshop Elements and type text you want to have on top of your photograph.3. Make sure that Text Layer is selected.4. Go to Layers Menu and go to 'Layer Style' & then 'Style Settings'5. Check 'Storke' and put it between 1 to 6... Ensure that appropriate color is selected for Stroke6. Now go to Layer Mode and Select 'Exclusion'7. It will make the Text area transparent and boundary will show the text on top of it.

2. Select Text-Tool from left side of Adobe Photoshop Elements and type text you want to have on top of your photograph.

Text Blending is defined in various ways and many folks want to use Text Blending on their photographs. Here we are trying to share the basic way of applying it and the method used should be helpful in understanding the way blending happens... So let's go step by step1. Open your photograph in Adobe Photoshop Elements Editor2. Select Text-Tool from left side of Adobe Photoshop Elements and type text you want to have on top of your photograph.3. Make sure that Text Layer is selected.4. Go to Layers Menu and go to 'Layer Style' & then 'Style Settings'5. Check 'Storke' and put it between 1 to 6... Ensure that appropriate color is selected for Stroke6. Now go to Layer Mode and Select 'Exclusion'7. It will make the Text area transparent and boundary will show the text on top of it.

3. Make sure that Text Layer is selected.

4. Go to Layers Menu and go to 'Layer Style' & then 'Style Settings' 

5. Check 'Storke' and put it between 1 to 6... Ensure that appropriate color is selected for Stroke.

Text Blending is defined in various ways and many folks want to use Text Blending on their photographs. Here we are trying to share the basic way of applying it and the method used should be helpful in understanding the way blending happens... So let's go step by step1. Open your photograph in Adobe Photoshop Elements Editor2. Select Text-Tool from left side of Adobe Photoshop Elements and type text you want to have on top of your photograph.3. Make sure that Text Layer is selected.4. Go to Layers Menu and go to 'Layer Style' & then 'Style Settings'5. Check 'Storke' and put it between 1 to 6... Ensure that appropriate color is selected for Stroke6. Now go to Layer Mode and Select 'Exclusion'7. It will make the Text area transparent and boundary will show the text on top of it.
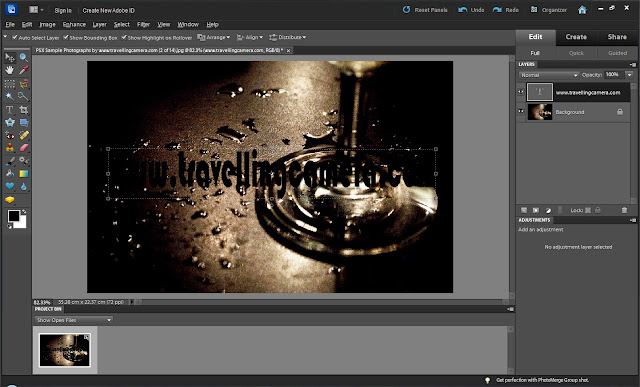
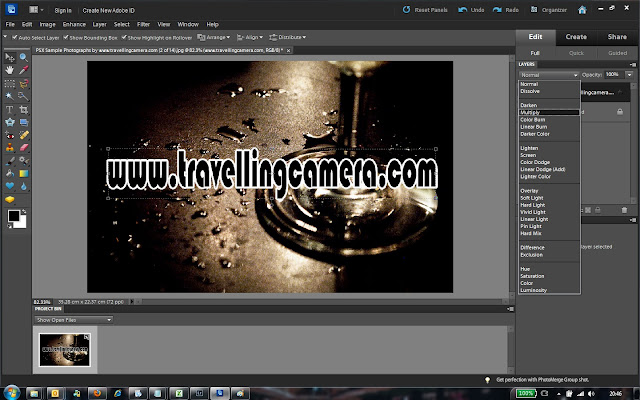
6. Now go to Layer Mode and Select 'Exclusion'

Text Blending is defined in various ways and many folks want to use Text Blending on their photographs. Here we are trying to share the basic way of applying it and the method used should be helpful in understanding the way blending happens... So let's go step by step1. Open your photograph in Adobe Photoshop Elements Editor2. Select Text-Tool from left side of Adobe Photoshop Elements and type text you want to have on top of your photograph.3. Make sure that Text Layer is selected.4. Go to Layers Menu and go to 'Layer Style' & then 'Style Settings'5. Check 'Storke' and put it between 1 to 6... Ensure that appropriate color is selected for Stroke6. Now go to Layer Mode and Select 'Exclusion'7. It will make the Text area transparent and boundary will show the text on top of it.
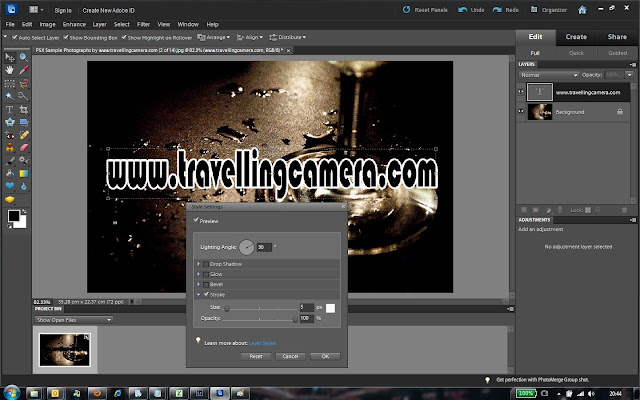
7. It will make the Text area transparent and boundary will show the text on top of it.
Text Blending is defined in various ways and many folks want to use Text Blending on their photographs. Here we are trying to share the basic way of applying it and the method used should be helpful in understanding the way blending happens... So let's go step by step1. Open your photograph in Adobe Photoshop Elements Editor2. Select Text-Tool from left side of Adobe Photoshop Elements and type text you want to have on top of your photograph.3. Make sure that Text Layer is selected.4. Go to Layers Menu and go to 'Layer Style' & then 'Style Settings'5. Check 'Storke' and put it between 1 to 6... Ensure that appropriate color is selected for Stroke6. Now go to Layer Mode and Select 'Exclusion'7. It will make the Text area transparent and boundary will show the text on top of it.

Comments

Trending Post Today !

How to reach Kasol/Malana and top things to do around this stunning hill-station of Himalayan State of India

Main places to see & Top things to do around Dalhousie : Stunning Hill Station in Himalayan State of India